US 2×2 passport photo size, explained without guessing
A US passport or many US visa photos must be a square 2×2 inch (about 51×51 mm) color portrait. Outer size alone is not enough: chin-to-crown height, eye position, and a plain white or off-white background are checked just as carefully. This guide walks through the measurements reviewers use, how print and digital files both map to the same square, and how to verify your crop before you mail prints or upload a JPEG. Always confirm the latest wording on travel.state.gov for your exact application type.
The official square: inches and millimeters
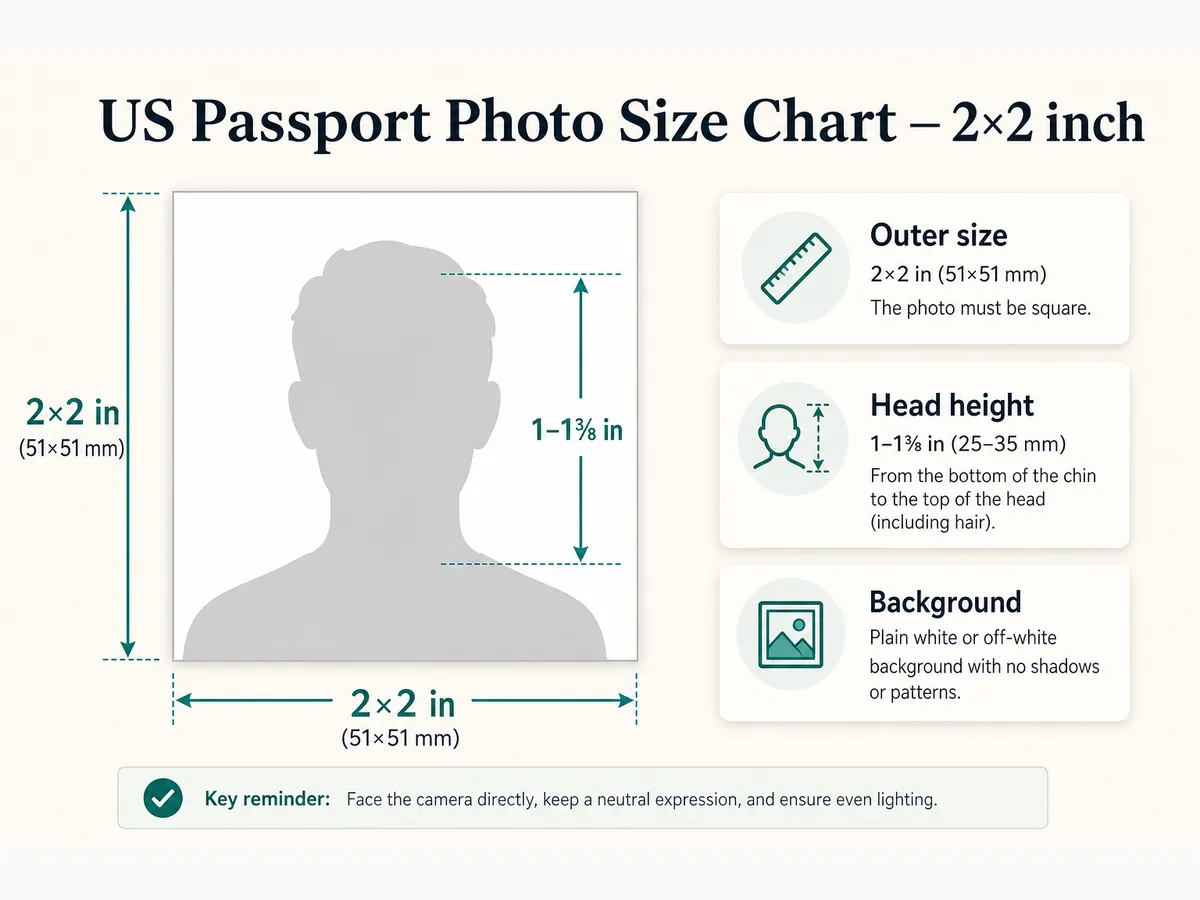
The finished photo—whether printed or displayed as a digital upload—must measure 2 inches by 2 inches. In metric that is about 51 mm by 51 mm. Reviewers treat this as a hard outer frame: a slightly rectangular crop, a stretched selfie, or a print that is 2×2.5 inches will not meet the published size.
Inside that square, your head from the bottom of the chin to the top of the head (including hair) should fall between 1 and 1⅜ inches (about 25–35 mm). That is roughly half to a bit more than two-thirds of the image height. Eyes should sit in a band about 1⅛ to 1⅜ inches from the bottom edge of the photo.
Think of three nested checks: outer square → head height band → eye line. Passing only the outer square while the head is tiny in the middle is a common fail. Passing head height while eyes sit too low or too high is also a problem.
- Photo size: 2×2 inches (≈51×51 mm), square
- Head height (chin to crown): 1–1⅜ inches (≈25–35 mm)
- Eye height: about 1⅛–1⅜ inches from the bottom of the photo
- Color photo on a plain white or off-white background
- Recent photo that looks like you now (typically within six months)
Why head height fails more often than outer size
Most home prints and phone crops get the square shape roughly right. What fails is head height: too much empty space above the hair, or a tight crop that clips the crown and leaves the chin barely inside the frame.
Hair volume counts toward crown height. Tall styles, buns, and volume at the top of the head can push you out of the 1–1⅜ inch band even when the face itself looks centered. If your hair is high, leave less empty sky above the crown when you crop—without cutting into the hairline.
Glasses, bangs, and religious head coverings change how reviewers read the face. Eyes must remain fully visible. Head coverings are only for allowed religious or medical reasons, with the face clear from chin to forehead. Never stretch a rectangular photo into a square; that distorts facial proportions.
- Leave a little space above the head so you can fine-tune the crop
- Do not crop so tight that the top of the hair is cut off
- Keep both sides of the face visible; shoulders roughly square to the camera
- Use a head-guide overlay instead of freehand zoom when possible
Print path: measuring after you cut
Paper applications usually need two identical 2×2 prints on photo-quality paper. After cutting, put a ruler on the print: the outer edge should be a true 2-inch square, and chin-to-crown should land in the published inch range.
Home and kiosk printers sometimes scale slightly if the print dialog uses “fit to page.” Always print at 100% / actual size. A template-based 4×6 sheet of multiple 2×2 copies reduces guesswork when you cut.
If you are unsure about scale, print a test copy on plain paper first, measure, then reprint the final set on photo paper. Matte or glossy photo paper is fine when it meets official paper-quality expectations—plain office stock is not.
- Two identical prints when your form asks for two
- Photo paper only for mail-in applications
- Print at 100% scale; verify with a ruler after cutting
- Do not laminate; do not write on the face of the photo
Digital path: same square, different file rules
Online renewal still expects a portrait that looks like a proper 2×2 photo when shown at that size. The form adds JPEG type and file-size limits that printed photos do not have. Check travel.state.gov for the current upload limits before you submit.
Pixel count is not a substitute for composition. A huge phone photo with a tiny face in the middle still fails head-height rules after crop. Crop to the square with guides first, then export a clear JPEG within the published size range.
HEIC from iPhones often needs conversion to JPEG before upload. Convert first, then crop. Do not rely on beauty filters or AI background tools—those edits can trigger automated or human review failures.
2×2 vs 35×45 mm and other country sizes
US 2×2 inches is not the same as UK or many Schengen 35×45 mm photos. Those are taller rectangles with different head-height and often different background guidance. Do not reuse a US square crop for a GOV.UK or foreign visa form unless that country’s rules explicitly match.
Some US visa categories also use 2×2. Always open the official page for the exact form you are filing. Third-party charts go stale; the government page for your process is the source of truth.
- US passport / many US visas: 2×2 inch square
- UK passport: typically 35×45 mm rectangle (confirm on GOV.UK)
- Australian passport: confirm current APO / Passports Office guidance
- Never assume one country’s crop works for another
How to check a crop without a photo booth
On screen, use a cropper that shows chin-to-crown and eye-line guides for the US template. Zoom to 100% and look for soft focus, shadows behind the head, or a background that is cream or textured rather than plain white or off-white.
On paper, measure the square and the head. If either is off, adjust the crop and reprint—do not try to “fix” a bad crop by stretching. Keep the uncropped original so you can try again without quality loss.
Our free browser tool applies a US 2×2 template on your device so you can align the head before download. It does not replace official review; always verify against travel.state.gov before you pay fees or mail forms.
Common size mistakes to avoid
Size errors often travel with lighting and background errors. Fix the photo setup first, then crop. A perfect 2×2 crop of a shadow-heavy wall still fails.
- Stretching a horizontal selfie into a square
- Head too small with large empty margins
- Head too large with crown or chin cut off
- Printing at “fit to page” so the square is not true 2×2
- Submitting a 35×45 mm foreign print for a US form
- Using a beauty filter that changes face shape after crop
When you need prints and when you need a file
Mail-in and many in-person paper applications need printed photos. Online renewal typically needs one digital file. Some travelers need both (for example, passport renewal plus a separate visa). Keep one master cropped JPEG and derive prints from it so everything matches.
If your process changes mid-way—paper to online or the reverse—do not assume the same deliverable works. Re-read the photo instructions for the path you are actually using.
Quick pre-submit size checklist
If any checklist item fails, retake or re-crop before you submit. Fixing a photo after a rejection usually costs more calendar time than one careful measurement pass.
- Outer frame is a true 2×2 inch square (print) or correct square proportions (digital)
- Chin-to-crown height in the 1–1⅜ inch band
- Eyes roughly in the published height band from the bottom edge
- Plain white or off-white background, even light, no filters
- Two identical prints or one compliant JPEG, depending on your form
- You verified the latest official page for your application
Ready to crop your photo?
Free online tool—pick your country template (US 2×2 or UK 35×45), align your head, and download. No account needed.