
How to take a newborn passport photo at home
A newborn passport photo follows the same US 2×2 idea as an adult photo—but the setup is different. You need a plain white or off-white background, a clear face, and no toys, pacifiers, or other people in the frame. This guide walks through a calm home method for newborns, infants, and toddlers, then covers cropping, prints, and the rejects that waste a quiet window. Always confirm the latest infant wording on travel.state.gov for your exact application type; this page is a practical setup guide, not a substitute for official review.
What the rules actually require
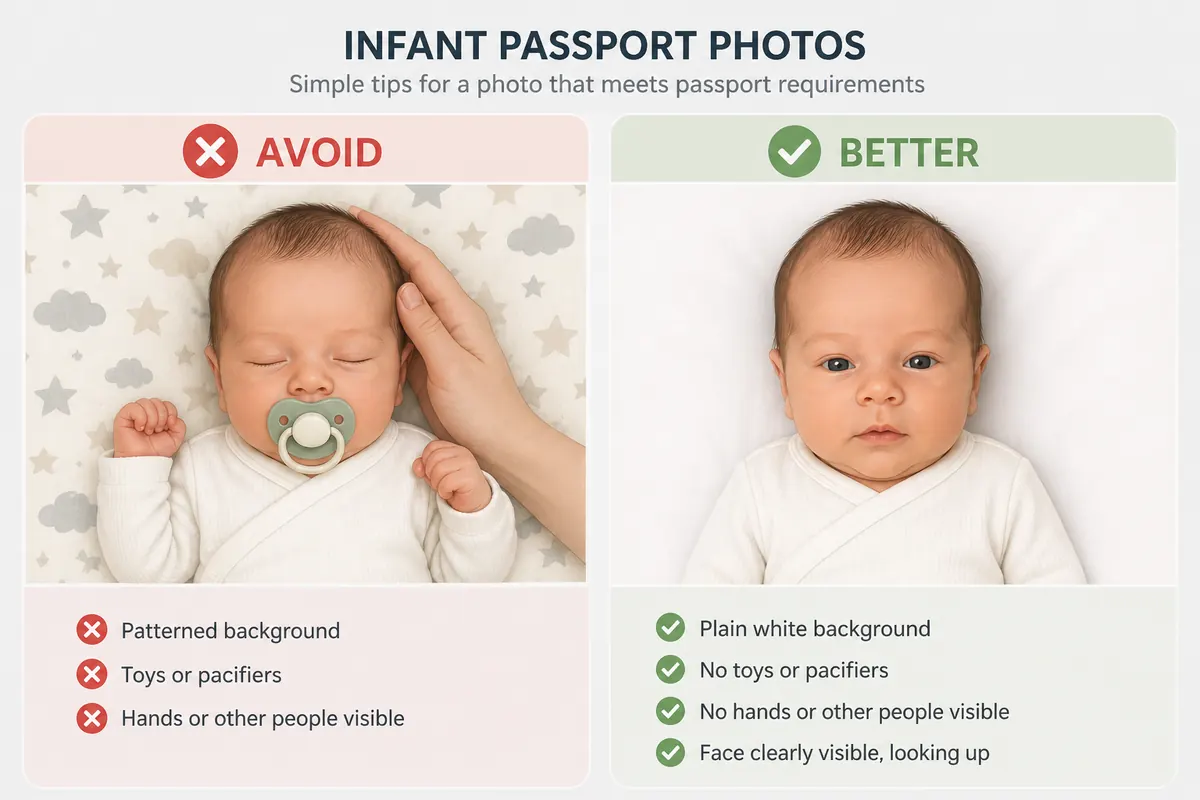
No other person should appear. Lay the baby on a plain white or off-white sheet so the background is clear. Toys, pacifiers, bottles, and hands holding the head must not show. Reviewers are checking identity and a usable biometric-style face—not a keepsake newborn session.
Photograph from above, or hold the baby with both hands fully outside the frame. Center the face and aim for a look toward the camera when possible. Profile shots, chin-up “cute” angles, and basket props fail for the same reason: the face is not presented the way passport rules expect.
Size after crop still follows adult US guidance: a 2×2 inch square with chin-to-crown height in the published band. A perfect-looking newborn frame that is cropped too loose (tiny head) or too tight (clipped crown) still fails.
- Eyes open when possible; newborns may show slightly closed eyes if awake
- Face the camera—profile shots are not accepted
- No hats unless for an allowed religious or medical reason, with the full face visible
- Same 2×2 size and head-proportion rules as adult US passport photos
- Recent likeness—typically within six months; use a current photo for the application you are filing now
Step-by-step: photographing a newborn
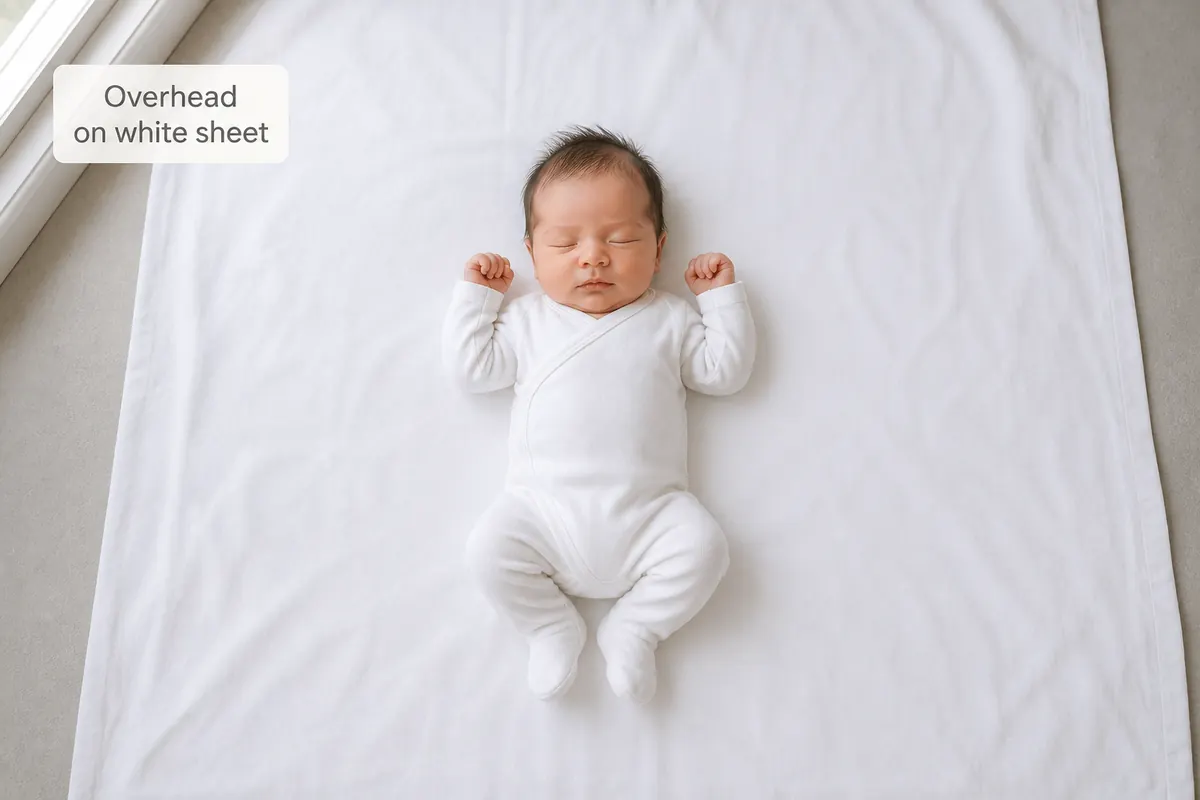
Wait for a calm window after a feed when possible. Spread a plain white sheet on the floor or bed near soft daylight. Place the newborn on their back, remove pacifiers and toys, then stand directly above and shoot straight down so the camera plane is parallel to the face.
Take many frames in short bursts. Newborn eyes may be slightly closed—still try for open eyes and a closed mouth when you can. A parent can soothe from outside the frame without appearing in the photo. Stop when the baby gets fussy; a second five-minute session beats one long struggle.
Skip newborn studio props, baskets, floral blankets, and “month milestone” setups. Those look cute for social media and fail passport review. If you already booked a keepsake session, plan a separate plain-sheet shoot for the passport.
- Prefer natural daylight; avoid flash pointed at the face
- Keep sessions under a few minutes, then pause if the baby gets fussy
- Shoot in bursts so you can pick the sharpest open-eye frame later
- One parent can stay just outside the frame to calm the baby
- Keep the uncropped original so you can re-crop without quality loss
Lighting without startling the baby
Use soft daylight from a window. Skip harsh direct flash when it causes squinting. Even light helps reviewers see facial features clearly and reduces shadows that look like background defects.
If the room is dark, bounce light off a white wall or ceiling rather than blasting the face. Two soft lamps at roughly eye level (or slightly above) can work when daylight is weak—keep them equal so one cheek is not much brighter than the other.
White noise or a parent’s voice outside the frame can help open the eyes without putting objects into the photo. Do not use a toy inside the crop as a “gaze magnet”; the toy will appear and fail review.
Newborns, infants, and toddlers — different setups
Newborns usually work best on their back with an overhead camera. Young infants who can hold a brief gaze still often succeed with the same sheet method.
Once a child can sit with support, you can use a plain sheet behind them—or a plain wall—if the background stays clean and no adult hands show. Standing shots work only when the child stays still enough for a sharp face.
The same reject list applies at every age: no toys in hand, no busy patterns, no second person in the frame. If the toddler will not sit, return to short seated or overhead sessions instead of forcing one long shoot.
- Newborn: overhead on plain sheet
- Sitting infant: plain wall or sheet behind; hands out of crop
- Toddler: short sessions; one sharp face beats a forced smile
- Never include siblings in the same passport photo
Clothing that helps (and what to skip)
Choose a solid onesie or top that contrasts with the white sheet—navy, soft charcoal, or another medium tone. Pale cream clothing on a white sheet can erase shoulder edges the same way a white adult shirt does on a white wall.
Avoid hoods that cast forehead shadows, big logos under the chin, and glittery fabrics that create hot spots. Hats are usually not allowed unless for an allowed religious or medical reason with the full face visible from chin to forehead.
Clothing color will not fix a patterned blanket or an adult hand in frame. Fix the background and support method first, then worry about the onesie.
Cropping and printing the US 2×2
Crop so the head size falls in the required range on a 2×2 square. Remove any supporting hands from the frame. Our free browser cropper can help with the US template after you choose the best shot—it does not replace official review.
For paper applications, print two identical photos on photo paper when required. Keep extras in case one gets damaged. If you print at a kiosk, use the cropped JPEG so both prints match. Do not let the kiosk auto-enhance faces.
Online renewal (when available for your case) needs a digital file that still looks like a proper 2×2 portrait. Convert HEIC to JPEG if needed, then crop. Do not rely on beauty filters or AI background tools on infant faces.
- Outer frame: true 2×2 inch square (print) or correct square proportions (digital)
- Chin-to-crown in the published US head-height band
- Plain white or off-white background with no furniture edges
- Two identical prints or one compliant JPEG, depending on your form
Common rejects for newborn and infant photos
When a set fails, change only the cited issue. Replacing a good background because the crop was wrong wastes a calm baby session.
- Parent hands or arms visible
- Toys, bottles, or pacifiers in frame
- Busy blanket or patterned sheet as background
- Blur from movement
- Head size too small after a loose crop
- Hospital bassinet rails, car-seat edges, or other furniture showing
- Deep sleep shot where the face is hard to identify
- Using a US photo for a UK or Australian application without re-cropping
Timing, safety, and calm sessions
Plan the photo day before non-refundable travel or appointment deadlines so you have buffer for a retake. Several short sessions across one or two days are normal.
Never leave a baby unattended on a bed or elevated surface for a photo. Keep one adult’s full attention on the child while another handles the camera when possible. This guide is about framing—not medical or developmental advice.
If the baby is ill, congested, or unusually unsettled, wait for a better day when eyes and expression are clearer. A rushed sick-day photo often means a second attempt anyway.
Before you submit — parent checklist
Pack a spare set in your documents folder. Infant applications sometimes need extras when pages are separated. Confirm whether your process needs a digital file, prints, or both before you spend money at a counter.
- Only the child appears; no hands, toys, or pacifiers
- Plain white or off-white background, even soft light
- Face clear, toward camera; eyes open when possible
- Cropped to US 2×2 with head size in range
- Correct deliverable: prints, JPEG, or both for your form
- You rechecked travel.state.gov infant/photo guidance for this application
Ready to crop your photo?
Free online tool—pick your country template (US 2×2 or UK 35×45), align your head, and download. No account needed.