
Passport photo rejected: read the reason, then fix it
A rejected passport photo almost always means one clear rule was missed—head size, background, shadows, expression, glasses, file type, or prohibited editing. For US applications, travel.state.gov notes that unacceptable photos are a top reason applications go on hold. This guide maps common reject reasons to practical fixes, explains online auto-check failures versus mail-in problems, and shows when to retake instead of editing. Final acceptance is always decided by the State Department; use this as a recovery checklist, not a guarantee.
How US photo rejections usually appear
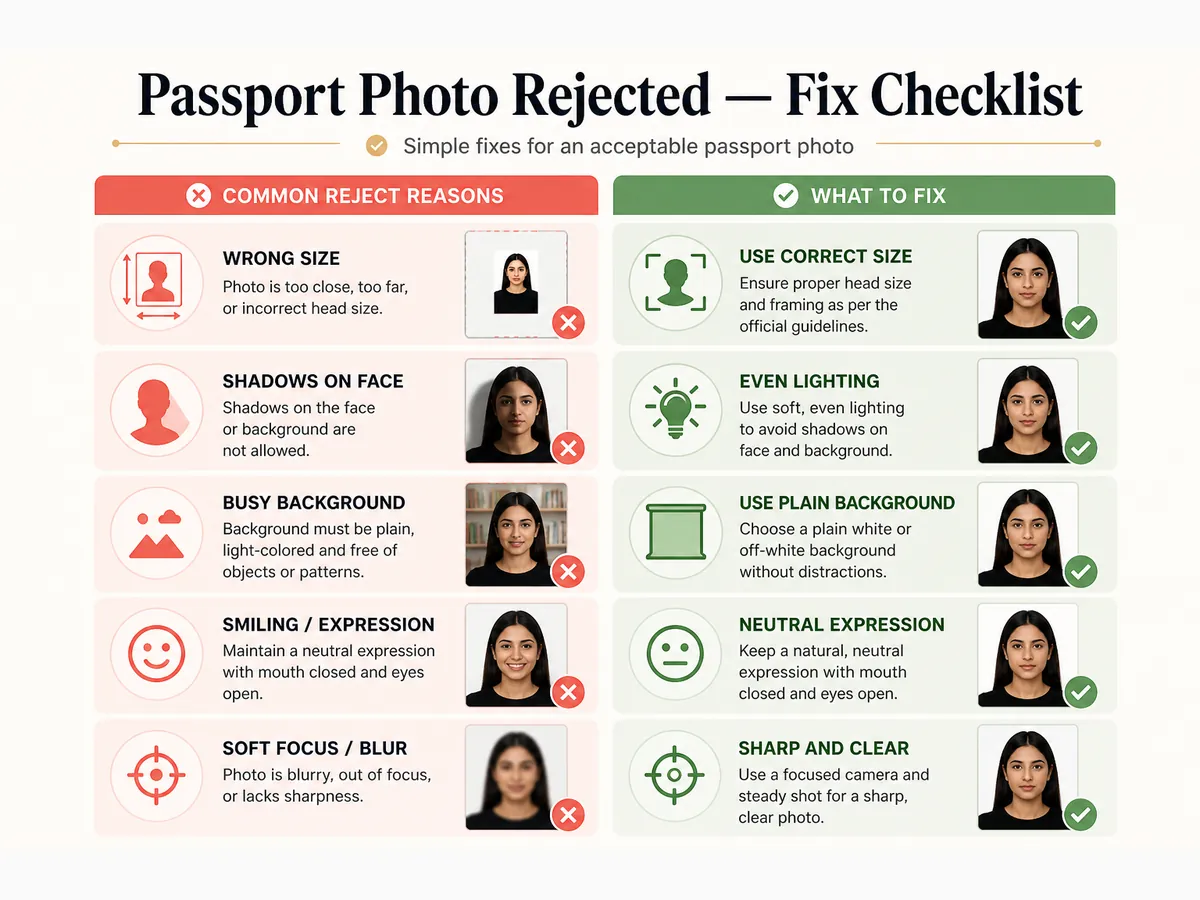
Online renewal often returns an automated message about crop, head size, background, or face position. Mail-in and in-person applications may come back with a letter or hold notice citing the same federal standards.
Read the exact wording before you reshoot. Fixing “head too small” with a new lighting setup wastes time if the only problem was crop. Fixing “shadows” with another crop of the same dark wall wastes time too.
Store photos are not exempt. A Walgreens or studio print can still fail digital upload if head size, glare, or background does not meet the file check—even when the paper print looked fine in the bag.
- Open the reject notice and note the named issue
- Compare against travel.state.gov photo examples
- Plan a retake or a clean re-crop—not a heavy edit
- Keep the original unedited capture when possible
Reject reason → fix (quick map)
Use this map as a first triage. Each line pairs a common failure with the action that usually works. Prefer a new capture over Photoshop, AI background removers, or beauty apps—official guidance requires an original, unedited photo without filters or digital changes that alter appearance.
- Head too small / too large → Re-crop with chin-to-crown guides (1–1⅜ in on a 2×2); retake farther/closer if crop cannot fix it
- Shadows on face or white background → Face a window or add a second lamp; stand farther from the wall; retake (do not paint out shadows)
- Busy / non-white background → Move to a plain white or off-white wall or hang a flat white sheet; retake
- Glasses glare or tinted lenses → Remove glasses (US default); retake without frames unless you have a rare documented medical exception
- Blurry, dark, or overexposed → Improve light, clean the lens, hold steady or use a timer; retake—crop cannot restore focus
- Filters / AI / beauty edits → Discard the edited file; shoot a natural photo and crop only for size
- Wrong file type or size (HEIC, huge/tiny JPEG) → Convert to JPEG within published limits; re-export without upscaling a soft image
- Photo older than six months / looks unlike you → Take a new recent photo that matches current appearance
- Smile / mouth open / eyes closed → Neutral expression, mouth closed, both eyes open; retake
- Selfie angle / tilted head → Rear camera at eye level with helper or tripod; retake facing the camera squarely
Head size and crop failures
On a printed US 2×2 photo, chin to top of head must fall between 1 and 1⅜ inches (25–35 mm). Digital uploads are judged as if the image were that square. A phone photo with a tiny face in the middle fails even at high megapixels.
Re-crop with a US template that shows chin-to-crown guides. Do not stretch a horizontal selfie into a square—that warps facial proportions and can look “edited” to reviewers.
If the original framing cuts the crown or leaves almost no margin, retake with more space above the head, then crop. Cutting hair off the top of the frame is a classic reject.
Background and shadow failures
US guidance requires a plain white or off-white background free of shadows, textures, objects, or lines. Cream walls, brick, curtains, and outdoor foliage are frequent fails.
Overhead-only lighting casts a shadow outline of the head on the wall. Move several feet from the background, face soft daylight, or use two lamps at face height. Do not erase shadows with AI tools that leave halos.
If you use a wheelchair head support that appears in frame, follow official instructions about including an explanatory note—do not improvise background edits.
Glasses, clothing, and prohibited edits
For US passport photos, remove eyeglasses, sunglasses, and tinted glasses unless you have a rare documented medical reason with a signed doctor’s note. Do not rest glasses on your head in the photo.
Remove hats and face coverings except for documented religious or medical reasons when the face stays fully visible. Take off employee badges and lanyards.
Beauty filters, skin smoothing, teeth whitening apps, and AI background replacement are high-risk. Submit the original unedited capture after a size crop only.
Online auto-check vs mail-in review
Online renewal runs automated checks first. Failures often cite dimensions, head position, background, or quality. Mail-in photos are reviewed by staff using the same standards, plus print quality problems (copy paper, creases, wet ink).
A file that failed online should not be “fixed” with heavy edits and reuploaded. Systems often flag unnatural backgrounds. Retake with better setup, then crop cleanly.
For prints, use photo-quality paper and submit two identical copies when required. Measure the 2×2 square after cutting. Soft kiosk prints from a blurry phone source fail the same way digital uploads do.
- Online: fix file type, crop, and lighting before reupload
- Mail-in: fix paper quality and identical pair count too
- Do not reuse a rejected JPEG with AI touch-ups
- Confirm current rules on travel.state.gov
When to retake vs when a re-crop is enough
Re-crop is enough when the original is sharp, evenly lit, on a plain white background, and only the head size or margins were wrong.
Retake when the source is blurry, shadowed, filtered, smiling, glasses-glared, older than six months, or shot at a selfie angle. No cropper can invent missing focus or a clean wall.
After a major appearance change (for example significant facial surgery), start from a new photo that matches how you look now. Minor changes like a short beard are often fine—major changes may not be.
Rejection recovery plan (step by step)
There is usually no mandatory waiting period once you have a new compliant photo. Speed comes from fixing the named issue once, not from uploading five variants of the same soft image.
- Write down the exact reject reason from the notice
- Match it to the reason→fix map above
- Change lighting or background first if those were cited
- Retake with rear camera / eye-level setup when needed
- Crop with US 2×2 head guides; export a clean JPEG
- Run a visual checklist (eyes, mouth, glasses, shadows, age of photo)
- Reupload or reprint—never the same failed edited file
Prevention checklist before the next submit
Our free cropper and checklist help you catch common problems before download—but they do not replace official review. If anything is borderline, retake while your setup is still ready.
- Taken within six months; looks like you now
- Plain white or off-white background; no shadows
- Chin-to-crown in the 1–1⅜ inch band on a 2×2
- Neutral expression; glasses removed (US default)
- No filters or AI edits; JPEG within form limits
- You verified the latest travel.state.gov photo page
Ready to crop your photo?
Free online tool—pick your country template (US 2×2 or UK 35×45), align your head, and download. No account needed.