Take a US passport photo with your iPhone
An iPhone can produce a compliant US passport photo when you control four things: rear camera (not selfie), even light on a plain white wall, eye-level framing, and a clean JPEG crop to 2×2. Most iPhone failures come from Portrait-mode blur, front-camera distortion, HEIC uploads, or overhead selfie angles—not from the phone model. This guide is an iPhone-specific workflow: Camera settings, HEIC conversion, tripod or timer setup, browser crop, and AirDrop to a Mac or print kiosk. Confirm visual rules on travel.state.gov before you renew.
iPhone home setup at a glance
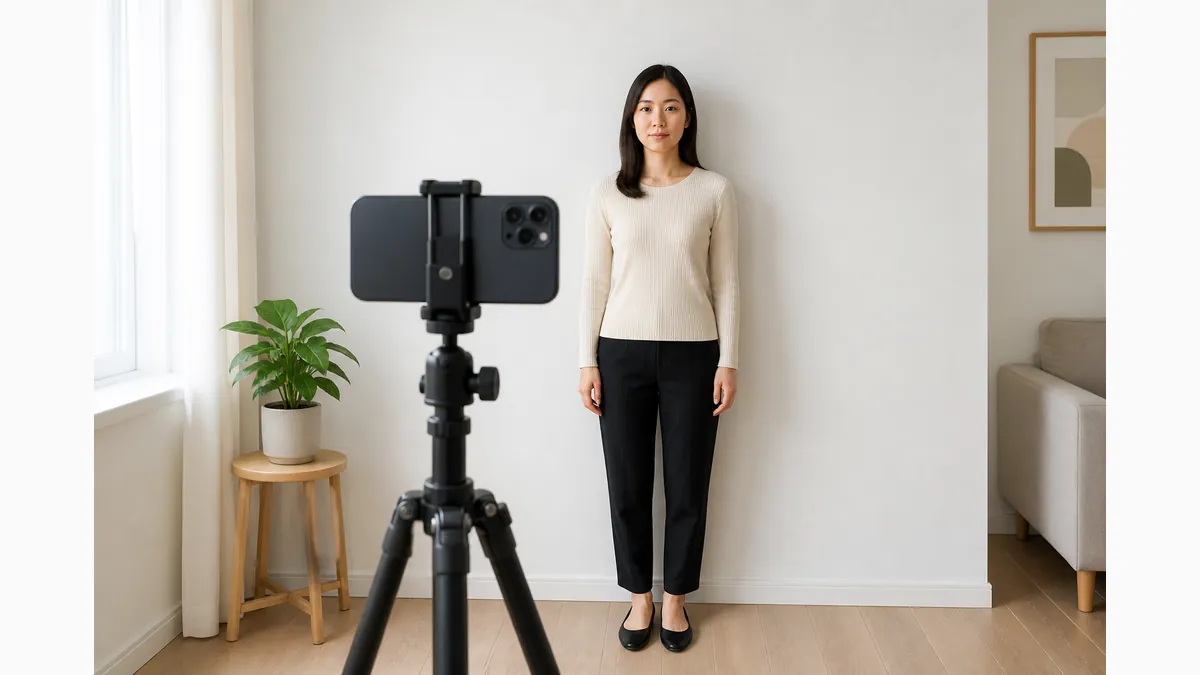
Pick a plain white or off-white wall. Hang a wrinkle-free white sheet if the wall is textured. Stand a few feet from the background so your head does not cast a shadow outline.
Place the iPhone on a tripod, stack of books, or ask a helper to hold it at your eye height. Use the rear (main) lens. Soft daylight facing a window beats a single ceiling light.
Wear a solid top that contrasts with the wall. Remove glasses for US photos (default rule), hats, earbuds, and lanyards. Take several frames and keep the sharpest natural one.
- Plain white or off-white background
- Rear camera at eye level (tripod or helper)
- Soft front light; no overhead-only selfie
- Timer on; Portrait mode off
Rear camera vs front selfie camera
Open Camera and switch to the rear lens. Front-camera selfies widen the face, show arm angle, and often tilt the head down—classic reject patterns on travel.state.gov examples.
If you are alone, use a tripod and the Camera timer (3 or 10 seconds), or Continuity Camera / a Bluetooth remote if you have one. The goal is a stable eye-level shot without holding the phone at arm’s length. Mirror apps that flip the preview can confuse left-right framing; trust the final still in Photos, not a mirrored live preview, when you judge head tilt.
Clean the rear lens with a soft cloth. Fingerprint smudges look like soft focus and waste an otherwise good setup.
HEIC, JPEG, and what online forms accept
Many iPhones save photos as HEIC. US online renewal and most crop tools expect JPEG. If upload fails with a vague format error, convert HEIC to JPG first—then crop.
You can convert on a Mac with Preview/Photos, or use a trusted converter such as HEIC.best, then upload the JPG to our free cropper. Prefer a moderate-quality JPEG that stays sharp without crushing detail.
Do not keep re-saving the same JPEG at lower quality. Start from the original HEIC or high-quality export, convert once, crop once.
- Convert HEIC → JPEG before online forms
- Avoid beauty filters and Photographic Styles that change skin
- Turn off Live Photo if you only need a still—or export the sharpest still frame
- Check travel.state.gov for current file-size limits after crop
Lighting, background, and iPhone modes to disable
Stand facing a window for soft, even light—or place two lamps at face height. Avoid strong overhead-only light that creates eye-socket shadows and a head outline on the wall. If your only bright light is behind you, turn around—backlight silhouettes the face and is a fast path to rejection even with a perfect later crop.
Turn off Portrait mode. Artificial background blur fails passport rules that need a naturally plain, evenly lit background. Skip Night mode unless the face stays sharp and colours look natural; noisy night shots usually fail.
Do not use flash as your only light—hot spots and red-eye are common. Tap the face to set focus and exposure; on many iOS versions, press and hold to lock AE/AF.
- Portrait mode off
- No beauty / retouch apps
- Plain wall; no shelves or wallpaper patterns
- Focus locked on the face at eye level
Eye-level tripod and timer workflow
Set the iPhone so the rear lens sits at your eye height. Looking down from above shortens the face; looking up from below exaggerates the chin. Square your shoulders to the camera.
Start the timer, step into place, and hold a neutral expression with mouth closed and both eyes open. Shoot a burst of three to five frames so you can pick the sharpest still. Keep earbuds and Apple Watch charging cables out of the frame; small objects behind or beside you still count as clutter.
Leave a little space above the head for cropping. You will cut to a 2×2 square later; a tight headshot with no margin is harder to rescue.
Crop to 2×2 in the browser
After you have a sharp JPEG, open our free cropper on the iPhone or on a Mac after AirDrop. Choose the US 2×2 template and align chin-to-crown within the published 1–1⅜ inch guide. If you crop on iPhone Safari, stay in portrait orientation so the square guides stay readable; landscape thumbnails make head-height harder to judge.
The tool runs on your device for cropping—nothing needs to be uploaded to our servers to use the crop step. Zoom to 100% and check for soft focus, leftover shadows, and glasses glare before you download.
For online renewal, export a JPEG within the form’s size limits. For paper applications, keep the same master crop so prints match the digital file.
AirDrop to print (drugstore or home)
Need two identical prints? Crop first, then AirDrop the JPEG to a Mac, or save it to Files / Photos. Upload a 4×6 sheet layout to a drugstore kiosk (often six 2×2 copies per sheet) and cut two identical squares. Many US drugstore apps accept a 4×6 JPEG from Files; name the file clearly so you do not upload an uncropped Camera Roll original by mistake.
AirDrop keeps quality higher than messaging apps that recompress images. If you email the file to yourself, confirm it was not heavily compressed before you print.
Print on photo paper at 100% scale. Measure the 2×2 square after cutting. Do not laminate. Online renewal typically needs the digital file only—print when your form asks for paper photos.
- Crop → master JPEG → AirDrop or kiosk upload
- Prefer AirDrop / Files over chat-app sends
- Print at actual size; verify with a ruler
- Keep extras if you mis-cut
iPhone-specific mistakes to avoid
Any of these can fail a photo that otherwise had a good wall. Fix the capture path first; cropping cannot undo Portrait blur or selfie distortion.
- Front-camera selfie angle
- Portrait mode background blur
- Uploading HEIC to a JPEG-only form
- Flash-only lighting or Night-mode noise
- Beauty filters or Dramatic/Photographic Styles that change tone
- Messaging-app compression before print
iPhone passport photo checklist
If any item fails, reshoot while the tripod and wall are still set up. One careful iPhone session beats three rushed selfie attempts.
- Rear camera, eye-level, timer or helper
- Plain white/off-white wall; even front light
- Portrait off; no filters; glasses removed (US default)
- HEIC converted to JPEG
- 2×2 crop with head height in range
- AirDrop/print or upload per your form; rules checked on travel.state.gov
Ready to crop your photo?
Free online tool—pick your country template (US 2×2 or UK 35×45), align your head, and download. No account needed.